Tuesday, September 29, 2009

Gingery Goodness

I love using ginger in recipes. I have several ginger cookie recipes I will have to post at some point, but I've been using ginger in some interesting fruit dishes lately.

This recipe is one I clipped from the newspaper years ago (it's from Bobby Flay's book "New York City Cooks"). I think I tried it years ago, but I used dried ginger because I didn't have a ginger grater. I now have a spiffy Microplane zester, and the fresh ginger is awesome! The pears were excellent, but they are mild enough in flavor, I think you would be hard pressed to notice the difference between pears and apples in this recipe. Use whatever is cheaper, or what kind of tree you have in your backyard!

Pear and Ginger Crisp with Spiced Whipped Cream

Topping:
  • 1/2 cup pecans
  • 1 cup all-purpose flour
  • 1/2 cup light brown sugar
  • 4 tsp. granulated sugar
  • Pinch of ground cinnamon
  • Pinch of salt
  • 6 T butter, softened
Filling:
  • 1 1/2 T grated fresh ginger
  • Juice of two lemons
  • 2 T grated sugar
  • Pinch of salt
  • 6 medium pears, peeled, cored, cut lengthwise into 1/2-inch slices
Spiced Whipped Cream
  • 1 cup heavy cream
  • 1 T sugar
  • 1/8 tsp. each ground cinnamon, ground ginger and nutmeg
Preheat oven to 375°. Butter baking dish. (I used my cute little pan-- 9x7, maybe?) Toast pecans in over for about 8 minutes and set aside. When cool, chop into desired consistency. (I like mine really fine, although the recipe calls for a "coarse" chop). In another bowl, mix flour, sugars, cinnamon and salt. Use a spoon (or pastry cutter) to slowly stir in the butter. Add pecans.

In another bowl, mix ginger, lemon juice, sugar, salt and sliced pears. Turn into prepared baking dish and cover with topping mixture. Bake until topping is crisp and pears are soft when pierced with the tip of a knife, about 40 minutes.

Whip the cream and then beat in sugar and spices.

The pears, awaiting the topping.

A lovely serving, with the whipped cream!

Wow, this was good!

The whipped cream was excellent, too. I was worried it would be too spicy, but there was just a hint of spice while maintaining the coolness of whipped cream.

The next recipe is from Orangette. I loved her recent book, A Homemade Life: Stories and Recipes from My Kitchen Table. I doubled the recipe, since I had bought a big bag of plums at the farmer's market the week before.

Plum Crumble

Plum Spices:
  • 1/4 cup brown sugar
  • 3 T all-purpose flour
  • 1/2 tsp. ground cinnamon
  • 1/2 tsp. ground ginger
  • 1/4 cup finely chopped crystallized ginger (I found this in the gourmet spice section at Wegmans, but for you Albany folks, Evan says Candy Kraft sells this!)
  • About 24 Italian prune plums, halved and pitted (I bought freestone plums, they are SO much easier than the other ones I bought this summer.)
Topping:
  • 1 1/2 cups granulated sugar
  • 2 cups all-purpose flour
  • 1 tsp. ground cinnamon
  • 2 tsp. baking powder
  • 1/2 tsp. kosher salt
  • 2 eggs, well-beaten
  • 14 (!!!) T butter, melted
Preheat the oven to 375°. In a medium bowl, whisk together the seasoning for the plums: the brown sugar, flour, cinnamon, ginger and crystallized ginger. Add the plums and gently stir to coat. Arrange the plums skin side up in an ungreased baking dish. (Same cute baking dish as the pear crisp, which was probably too small. Maybe a 13x9?)

They do NOT look pretty right now, even accounting for the terrible light.

In another medium bowl, combine the dry ingredients for the topping. Whisk to blend well. Add the eggs. Using your hands (I did a first stir with the pastry cutter), mix thoroughly, squeezing and tossing and pinching handfuls of the mixture, to produce moist little particles. Sprinkle evenly over the plums. Spoon the butter evenly over the topping, and bake for 30 to 35 minutes, until the top is browned and the plums yield easily when pricked with a knife or toothpick. Let cool some before serving with creme fraiche (I still have yet to ever try this!), thick yogurt, or whipping cream. Or vanilla yogurt. Mmm...

This topping is excellent, and the plums are prune-y and gingery. Delicious!

The next recipe is from Cook's Country, one of my favorite food magazines. I read Marilyn's copies, and then I subscribe to the online archives. It's the best gingerbread I have ever had! The only change I made was to the liquid for the cake-- the recipe called for 3/4 cup stout. I had no idea how to go about buying that amount of beer, and I decided I could find some acceptable substitute. I searched "alcohol substitutes" but didn't find much to help me in a recipe dessert. The usual answer was chicken broth. I thought about what other flavored waters were available-- tea seemed the perfect answer to a gingerbread recipe!

Bold and Spicy Gingerbread

Cake:
  • 2 1/2 cups all-purpose flour
  • 2 tsp. baking powder
  • 3/4 tsp. baking soda
  • 3/4 tsp. salt
  • 16 T (2 sticks) butter
  • 2 T ground ginger
  • 2 tsp. ground cinnamon
  • 1 tsp. ground allspice (I don't have allspice; mixed equal parts ground cinnamon, cloves, nutmeg and black pepper, and that worked fine!)
  • 1/4 tsp. finely ground black pepper
  • 4 large eggs, room temperature
  • 1 1/2 cups sugar
  • 4 tsp. fresh ginger
  • 3/4 cup molasses, "robust" or "dark"
  • 3/4 cup black tea
Glaze
  • 1 3/4 cups confectioner's sugar
  • 3 T ginger ale OR orange juice OR lemon juice
  • 1 tsp. ground ginger
Heat oven to 375°. Grease and flour 12-cup Bundt pan. Whisk flour, baking powder, baking soda, and salt in large bowl. Melt butter in saucepan over medium heat until bubbling. Stir in ground ginger, cinnamon, allspice, and pepper and cook until fragrant, about 30 seconds. Remove from heat and let cool slightly.

Whisk eggs, sugar and fresh ginger in large bowl until light and frothy. Stir in melted butter mixture, molasses, and tea until incorporated. Whisk flour mixture into egg mixture until no lumps remain. Pour batter into prepared pan and gently tap on countertop to release any trapped air bubbles. Bake until toothpick inserted into center comes out clean, about 45 minutes. Cook cake in pan 20 minutes, then turn out onto wire rack set inside rimmed baking sheet. Let cool completely.

For the glaze, whisk confectioner's sugar, ginger ale (or preferred juice) and ginger in bowl until smooth. Pour glaze over cooled cake. Let glaze set 15 minutes. Serve. Cake can be stored at room temperature, covered in plastic wrap, for two days.

I don't have a picture of this gingerbread, since I haven't made it since last winter. I still have some fresh ginger in the fridge, though, and the air is getting full of autumn, so I will be making it soon!

Tuesday, September 22, 2009

First Day of Fall = Soup!

This picture was taken in the Adirondacks this same weekend last year! It actually has been feeling like fall here for a couple of weeks. We don't eat much soup in the summer, but now that it's chilly outside we'll be having lots of it!

I made this tomato soup for Friday night supper.

Creamy Tomato Soup
  • 4 slices bacon
  • 2 cloves garlic, minced
  • 2 cans (28 oz. each) tomatoes (I like to do one can of peeled, whole tomatoes and one can of crushed, but I've used lots of variations, and they all work!)
  • 1 cup chicken broth
  • 1 T sugar
  • 1/4 tsp. black pepper
  • 1/2 cup heavy cream
  • 2 T balsamic vinegar (do NOT omit! [in my humble opinion!])
Heat a large, deep pot over medium heat; add bacon and cook until barely crisp. Remove bacon and reserve. Remove and discard all but one tablespoon of the drippings. Add garlic and cook, stirring, over medium heat, one minute. Add tomatoes and their juices, breaking up whole tomatoes with a wooden spoon. Add broth, sugar and black pepper; bring to a boil, then reduce heat and simmer 15 minutes with cover ajar. Cool for a while, then puree soup with reserved bacon. Be careful, hot soup in a blender can go fearfully awry! Return pureed soup to pot, stir in cream until incorporated, and heat through, 2 to 3 minutes. Remove from heat; stir in vinegar. This soup only gets better-- make the day before for best flavor!

Saturday, Rosemary made pumpkin soup for us! I have always thought, "Bleagh!" when I heard about pumpkin soup, but it was really good! It wasn't overwhelmingly pumpkin-y or spicy like pumpkin pie, just subtle goodness! There's lots of pumpkins around this time of year, I'll be making this soon.

Rosemary's Pumpkin Soup
  • 1/2 cup onion, chopped
  • 3 T butter
  • 2 cups cooked mashed pumpkin (Rosemary cooked the pumpkin, whole, in the microwave)
  • 1 tsp. salt
  • 1 T sugar
  • 1/4 tsp. cinnamon
  • 1/8 tsp. ginger
  • 1/8 tsp. black pepper
  • 3 cups chicken broth
  • 1/2 cup half-and-half (I only had cream in the house, it worked fine)
Saute the onion in the butter. Add the rest of the ingredients, except for the cream. Simmer for 15-20 minutes. Puree in a blender (carefully!), then add the cream and heat until hot (do not boil).

This next soup freezes well, and contains quite a few vegetables. A lot of the ingredients come from the can, so it's very fast to throw together.

Beef and Barley Soup
  • 1 lb. ground beef
  • 1 (16-oz.) can tomatoes, cut up
  • 1/4 cup ketchup
  • 1 quart water
  • 1 (16-oz) can whole kernel corn and juice
  • 1 (8 oz.) can water chestnuts
  • 6 stalks celery, sliced
  • 1/2 cup barley, uncooked
  • 1/4 tsp. pepper
  • 2 bouillon cubes
  • 2 bay leaves
  • 1 tsp. basil
  • 2 tsp. seasoned salt
  • 1 tsp. paprika
  • Carrots, sliced (I usually use a 10 oz. bag of frozen carrots, or 4-5 fresh carrots)
Brown meat and drain excess fat. Put all ingredients in Crock-Pot and stir. Cook on high 4 to 5 hours or on low 8 hours. Can also be done using kettle on top of stove, simmer a little over an hour.

I've got a lot more delicious soup recipes, but right now I have a wiggly 18-month old doing acrobatics on me, her personal jungle gym. Time to quit!

Sunday, August 23, 2009

Sweet and Savory

This is sort of a hodge-podge of recipes-- things I have been making over the last several weeks, but haven't had the time to post here!

Remember this pesto? Here's one of the things I used it for...

Four Cheese Pesto Pizza
  • 6 (6-inch) pita breads
  • 1 (8 oz.) package cream cheese, softened
  • 2 T milk
  • 6 T pesto
  • 1 can ripe olives, sliced
  • 1/2 cup shredded mozzarella
  • 1/2 cup shredded Fontina cheese
  • 2 T Parmesan cheese
Place pita breads on ungreased cookie sheet. Mix cream cheese and milk until smooth. Spread on pita breads. Gently spread pesto over cream cheese. Top with olives. Sprinkle with cheeses. Bake 7-12 minutes or until thoroughly heated and cheese is melted.

Except, this time, I didn't have pita breads. Or Fontina cheese. And I hate olives. But, I did make a pizza crust (still working on finding a recipe I really like for homemade pizza crust!) and loosely followed these instructions for the topping. I also added chopped chicken, from the following recipe. I have followed the four cheese pesto pizza recipe exactly (except for the olives) in the past, and it was very tasty.

Cooked Chicken (from Rival Crock-Pot Cookbook)
  • 2-3 pounds chicken breasts or parts
  • 4 cups water
  • 2 T chopped parsley
  • 2 tsp. garlic powder
  • 1 bay leaf
  • 1 T minced onion
  • 1 tsp. seasoning salt
Place all ingredients in Crock-Pot. Cook on low 6 to 8 hours or on high for 3-4 hours. Remove chicken from water, discard bay leaf, and shred or dice according to your preference.

This is such a handy recipe for when those big club packs of chicken are on sale. I cook it (my big crockpot can take a doubled recipe of this), chop it up, and freeze it. It's great having cooked chicken ready for casseroles, and it also makes excellent chicken salad for sandwiches. And you can put it on pesto pizza!

I cooked one of my favorite chicken recipes last night--

Spicy Buttermilk Chicken

Marinade:
  • 3/4 cup buttermilk
  • 1 T hot pepper sauce
  • 1 T Dijon mustard
  • 2 cloves garlic, minced
  • 1/2 tsp. black pepper
  • 1 tsp. salt
Mix together and pour over about 1 1/2 lbs. of chicken breasts or tenders. Marinate for at least four hours or overnight.

Topping:
  • 1 cup plain bread crumbs
  • 1/4 cup Parmesan cheese
  • 2 T flour
  • 2 tsp. dried thyme
  • 1/2 tsp. paprika
  • 1/2 tsp. cayenne pepper
  • 2 T olive oil
Combine topping ingredients and dredge chicken through the crumbs. Place chicken on a baking rack and let sit for 20 minutes, so that crumbs will adhere better. (I've skipped this step before without too noticeable a difference in the crumbs. Those twenty minutes are useful for working on other parts of the supper, though!) Drizzle one tablespoon of olive oil on a baking sheet and place in oven. Heat oven to 400°. After about 5 minutes, place chicken on heated baking sheet and bake for 30 minutes (tenders will be done in about 20 minutes).

Last night, I served this with potatoes, because I had some neglected potatoes that were thinking about sprouting, but I usually serve this with jasmine rice. Both ways are yummy! I also did some of the tenders differently for my kids, who aren't as fond of hot things-- when I was mixing the crumb coating, I took about 1/3 of a cup of the crumbs out before adding the cayenne pepper and paprika. I'm not sure the paprika adds much heat, but it made it easy to see the less hot tenders-- they weren't as red!

Now, on to sweet things...

I found a recipe for this Millionaire's Shortbread in Hannaford's "fresh" magazine, which I stole from my mother. I wish we had a Hannaford's in our area, so I wouldn't have to resort to thievery-- it's usually full of good recipes! I wasn't crazy over this recipe at first, but every little nibble made me more of a fan. Elliott loved these, too.

Millionaire's Shortbread

Shortbread base:
  • 3/4 cup (1 1/2 sticks) salted butter, softened
  • 1/3 cup sugar
  • 2 tsp. vanilla extract
  • 1 cup flour
  • 1/2 cup cornstarch
  • 1/2 tsp. baking powder
Caramel filling:
  • 1/2 cup (1 stick) salted butter
  • 1/2 cup sugar
  • 1/4 cup Lyle's golden syrup or dark corn syrup (I bought dark corn syrup, but I did see Lyle's golden syrup in Wegman's the next day!)
  • 1 (14 oz.) can sweetened condensed milk
  • 2/3 cup (4 oz.) semisweet chocolate chips
Preheat oven to 350°. Grease an 8- or 9-inch pan. In a large bowl, use an electric mixer on medium speed to cream butter and sugar until smooth and lightened in color, about 2 minutes. Scrape down sides and bottom of bowl and beaters as needed with a rubber spatula. Mix in vanilla. Sift together flour, cornstarch, and baking powder and add to bowl. Mix on low speed until dough forms large clumps and holds together, about 1 minute. Using your hands, press dough gently and evenly into pan. Bake until top is golden and edges brown, about 25 to 30 minutes.

While shortbread bakes, prepare caramel filling. Put butter, sugar, syrup and condensed milk in a large saucepan and cook over medium heat until mixture comes to a boil, stirring occasionally, about 10 to 15 minutes. (I don't know if I had the heat too high or I didn't stir enough, but I had to throw my first batch out-- watch it!) Continue boiling, stirring gently and constantly, 4 more minutes. Mixture should darken to a light caramel color. Remove pan from heat and pour filling over warm shortbread. Let filling cool about 5 minutes, then sprinkle chocolate chips over the top. Let chips soften until they melt, then use a knife or spatula to spread melted chocolate over filling. Let chocolate set until firm, 2 or 3 hours (or 15 in this heat!) When set, cut shortbread into squares (or cut a little piece out of the pan every time you walk by!)

A couple of weeks ago, Evan was dreaming about the lava cakes he had eaten at the restaurant "99" while working away from home this spring. It took me about three minutes to whip these up, and Evan was eating them 14 minutes later! He wolfed them down too fast to take a picture of them (well, the kids and I helped, too) but they are the chocolate cakes with fudgy filling oozing out of them when you eat them. Excellent with vanilla ice cream!

Molten Lava Cakes (Kraft Foods)
  • 4 squares Baker's Semi-Sweet Chocolate (or 4 oz. of chocolate chips)
  • 1/2 cup (1 stick) butter
  • 1 cup powdered sugar
  • 2 eggs
  • 2 egg yolks
  • 6 T flour
  • Whipped cream or vanilla ice cream, for serving
Preheat oven to 425°. Butter four 3/4 cup custard cups or souffle dishes. Place on baking sheet. Microwave butter and chocolate in large bowl on high for 1 minute or until butter is melted. Stir with wire whisk until chocolate is completely melted. Stir in sugar until well blended. Blend in eggs and egg yolks with whisk. Stir in flour. Divide batter among prepared custard cups. Bake 13 to 14 minutes or until sides are firm but centers are soft. (Evan felt 12 minutes would be better-- more goo, less side.) Let stand 1 minute. Carefully run small knife around cakes to loosen. Invert cakes onto dessert dishes. Serve immediately.

And, the cookie recipe I've made hundreds of times-- chocolate chip cookies. This is the recipe Evan's family makes. It's basically the Toll House recipe with oatmeal. Evan likes a steady supply of these for his lunches, and none of us are averse to eating the dough before it's cooked!

Evan's Chocolate Chip Cookies
  • 1 cup butter
  • 3/4 cup sugar
  • 3/4 cup brown sugar
  • 1 tsp. vanilla
  • 2 eggs
  • 1/2 tsp. water (I have NO idea why this is in the family recipe... makes you kinda wonder about those Whites-- you can probably safely omit this ingredient)
  • 2 cups flour
  • 1 tsp. baking soda
  • 1 tsp. salt
  • 2 cup oatmeal
  • 12 oz. (2 cups) semisweet chocolate chips
Cream together butter and sugars. Add vanilla and eggs; beat well. Add flour, soda, salt and oatmeal and beat until combined. Stir in chocolate chips. Eat cookie dough raw, or place tablespoons of the dough on a greased cookie sheet and bake in a 375° oven for 9 minutes. Let cool in pan, if you like them chewy.

There's no recipe attached to this activity, but we made some creamed corn this year! We came home from Altamont with four garbage bags of corn. (Thanks, Knaggs!)

Evan husked it all, with lots of help from the kids.

I then boiled it, about a dozen ears at a time, for 2 minutes, dunked it in ice water, and let drain on the drainboard.

I then used my handy-dandy Lee corn-cutter and creamer to take all the corn off the cobs.

All 95 cobs, eventually. This was early in the process.

I froze it in plastic Ziploc containers, and got about 6 1/2 quarts. It sure will be delicious this winter with a little butter and salt!

All this writing about food has made me hungry! Time to go check out the kitchen before bed...

Sunday, August 2, 2009

Food Processor Fun!

I love food processors. They can take a whole massive amount of basil...

(plus a few other ingredients)...

and turn it into this tiny (but wonderful) amount of stuff. Pesto, to be precise.

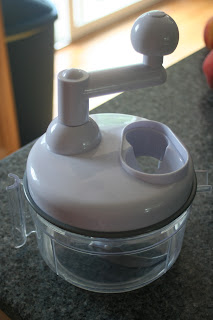
Much as I love the food processor I've had for a year now, I still haven't abandoned this.

It's a salsa maker that they sell at fairs and flea markets. Evan and I saw one years ago at the fair, and watched the demonstration, and tasted the salsa. It was so good, but Evan didn't think we needed one. Well, I (and by proxy, Evan) regretted that decision all year. So the next year, I bought one. It is the handiest onion chopper ever...

And it still does the best job of making salsa of anything out there! (Sorry, Most Beloved Food Processor.)

This is some of the green-leaf lettuce I bought at the farmer's market.

We made taco salad for supper the other night, it was all so fresh and yummy! I need to make lots more fresh salsa. My pesto is sitting in the fridge, too, waiting for me to use it. I often make grilled chicken and cheese sandwiches with pesto, or put it on a white pizza. We'll have to see what I actually do with it this week!

Pesto
This recipe is from Process This! by Jean Anderson. I got that book out of the library when I first got my food processor, and it was so helpful I actually went out and bought a copy.
  • 2 quarts loosely packed tender young basil leaves (two humongous bunches at the farmer's market should do it), washed and dried.
  • 1/3 cup pine nuts
  • 2 large whole cloves garlic, peeled
  • 2 T freshly grated Parmesan cheese
  • 3/4 tsp. salt
  • 1/4 tsp. freshly ground pepper
  • 1/3 to 1/2 cup oil (I ended up using closer to 1/3)
Place all ingredients except the olive oil in a food processor fitted with the medal chopping blade and churn for 30 seconds. Scrape down the sides of the bowl and churn 30 seconds longer to form a thick paste. With the motor running, drizzle the olive oil down the feed tube, adding only enough to give the pesto the consistency of prepared mustard. Scoop into a small bowl, press plastic food wrap on top to keep from darkening (I have experience in stating this is a VERY important step!) and refrigerate until needed. Bring to room temperature and stir well before using.

Fresh Salsa
  • Small white onion, chopped and rinsed
  • Juice of one lime
  • 5 Roma tomatoes, or 3 small regular tomatoes
  • 1/2 cup chopped cilantro leaves
  • 2-3 jalapeno or serrano peppers, seeded if you're a wimp like Evan
  • 1-2 cloves of garlic, peeled
  • 1/4 tsp. salt
Chop it all up in a food processor or the like. My sister Bethaney uses a blender, which makes a very finely chopped salsa. Eat immediately, although it will keep fairly nicely in the fridge.

Friday, July 31, 2009

Meatloaf! (I never said I was an epicurean)

Thursday was another Farmer's Market visit. I went crazy with lettuces, this time. I bought humongous heads of Romaine, green leaf, and iceberg lettuce. I didn't use any of them Thursday night, though.

Instead, we had corn on the cob! I love the random patterns Cheyenne makes on the cob.

We also had meatloaf, and Oven Crispy Cheese Fries.

Here's the potatoes, as I am cutting them into French fry shape. It's pretty easy-- slice the potato into 1/2" thick slices, then cut those slices into 1/2" sticks. Notice the bee-you-ti-ful tomatoes and lettuce in the background. Notice, too, that I'm not smart enough to take pictures of the finished fries. Or the meatloaf, which is the point of this post.

I have lots of meatloaf recipes. Meatloaf doesn't seem to have a very big fan base, but I like it, especially when using Full Circle Farm Grass-Fed Beef! Meatloaf is also a great meal to freeze for later-- I try to make two batches at once and freeze one and cook the other one for dinner. Not that that always happens, of course. Thursday afternoon all three kids fell asleep so I took a nap (cue ecstatic music). While wonderful, that meant I didn't have much time to throw supper together. I actually formed the meatloaf into 6 little loaves and microwaved them. I wouldn't say they were quite as good as when cooked in the oven, but they certainly were faster, and it freed up my oven for the oven fries.

I'm going to have a double oven someday. Someday.

This first recipe was given to me by my husband's cousin when we were married. It has very basic ingredients, but it is one of the yummiest meatloafs I've eaten!

Betty's Meatloaf
  • 1 1/2 lbs. ground beef
  • 1 cup dry bread crumbs
  • 1 tsp. salt
  • 1/4 tsp. pepper
  • 2 eggs
  • 1 tsp. dried minced onions
  • 1 can (15 oz.) tomato sauce, divided
Topping:
  • reserved tomato sauce
  • 2 T brown sugar
  • 1/2 cup sugar
  • 2 T vinegar
  • 2 tsp. prepared mustard
Mix together beef, bread crumbs, salt, pepper and eggs. (The best, while the messiest, way to do this is just to mix it with your hands). Add onions and one-half tomato sauce. Form into loaf in 9x3x5" pan (standard loaf pan). Bake at 350° for 50 minutes. In saucepan, combine topping ingredients; bring to a boil. Pour over meatloaf. Bake 10 more minutes.

Cheddary Meatloaf
This recipe was in the newspaper some years back. It was from a firehouse cook.
  • 2 lbs. ground beef
  • 1 large white onion, diced
  • 2 eggs, slightly beaten
  • 3/4 cup salsa
  • 2 cups grated sharp cheddar cheese
  • 1/4 cup prepared mustard
  • 1/4 cup dill relish
  • 1/2 cup dry Italian flavored bread crumbs
  • 6 bacon strips
Mix all but bacon together. Form into loaf in 13x9 pan. Lay strips of bacon across loaf. Cover with tin foil. Bake at 375° for 45 minutes; uncover and bake additional 15 minutes. Let stand 10 minutes. To serve, lift loaf out of the grease that formed when it cooked-- the meatloaf itself is NOT greasy, but it does produce grease in the bottom of the pan.

I usually make mashed potatoes to go with meatloaf, but I was wanting some of these fries that night. This recipe is from Emeril-- I've never tried any of his other recipes, but this was in Family Circle magazine, and it's a really good recipe!

Oven Crispy Cheese Fries
  • 2 tsp. vegetable oil
  • 2 large baking potatoes (about 1 1/2 lbs.), scrubbed
  • 1 large egg white
  • 2 tsp. Baby Bam (recipe following)
  • 8 oz. white cheddar cheese, grated
  • 2 T thinly sliced scallions (optional)
Place oven rack in the center of the oven and preheat oven to 425°. Grease large baking sheet with the oil. Pat potatoes dry and slice lengthwise into 1/2-inch-thick slices. Turn each slice flat and slice lengthwise into even fries. In a medium bowl, whisk egg white until very light and foamy. Add the potatoes to the egg white and toss to coat. Remove potatoes with a slotted spoon. Spread fries on greased baking sheet, leaving room between fries. Bake for 10 minutes. Remove from oven, sprinkle 1 tsp. Baby Bam. Flip fries, then sprinkle other teaspoon of Baby Bam. Bake 20 more minutes, until golden brown and crispy. Remove from oven and sprinkle with cheese. Bake 3 minutes, until cheese is melted. Sprinkle with scallions, if desired.

Baby Bam
This is Emeril's signature spice blend. I might halve the proportions, since I don't make a lot of Emeril's recipes. Maybe I should, though, this recipes sure is good!
  • 3 T paprika
  • 2 T salt
  • 2 T dried parsley
  • 2 T onion powder
  • 2 T garlic powder
  • 1 tsp. black pepper
  • 1 tsp. oregano
  • 1 tsp. basil
  • 1 tsp. thyme
  • 1/2 tsp. celery salt
Mix together. Can be stored in an airtight container for up to 3 months.

And, if meatloaf is not your thing, here's a great sandwich that you can eat with the Cheese Fries. This was in the same issue of Family Circle magazine (many years ago now!) and I always serve them together. This is NOT an Emeril recipe, although it, too, is Cajun.

Cajun "Crab Cake" Sandwich
  • 12 oz. surimi (imitation crabmeat)
  • 1/2 small onion
  • 1 rib celery
  • 1 small pepper, cored and seeded
  • 1/4 cup mayonnaise
  • 1/4 cup unseasoned breadcrumbs
  • 2 large egg whites, slightly beaten
  • 2 tsp. Cajun seasoning
  • 1/2 tsp. hot-pepper sauce
Heat oven to 400°. Coat baking sheet with nonstick cooking spray. In food proccesor, pulse all ingredients until just chopped. (Or, if you're not a Cool Kid with a food processor, chop it all by hand.) Divide mixture into four portions; firmly press one portion into 3/4 cup dry measuring cup. Invert and tap on baking sheet to remove. With hands, slightly press and shape mixture into a 4-inch patty, about 1-inch thick. Repeat with remaining portions. Bake in 400° oven until browned, about 40 minutes. Serve on buns, with Oven Crispy Cheese Fries on the side!

That's all for tonight! Tomorrow I might post some recipes that actually use all the lovely green stuff I bought at the farmer's market.

Wednesday, July 29, 2009

Last Thursday's Supper

Last Thursday morning I went to the farmer's market in Syracuse. While I always love the farmer's market, it's usually a little overwhelming to consider going there. I discovered the secret-- don't go on Saturday! On Saturday it is crowded, and there are lots more vendors selling things other than fresh produce. This Thursday, I parked right next to the market, breezed through selecting yummy things, and was out again quickly! That's really key when there's three kids with you.

I have no idea what to do with eggplant at this point in my life, but I just loved the colors, so I had to snap a picture.

Cheyenne eating one of the little plums we bought.

It isn't ALL fresh vegetables-- there's some pretty yummy fresh-made doughnuts we had to sample!

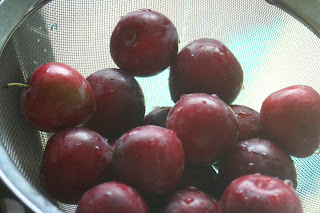
Aren't these pretty little plums? They were destined for plum torte.

Fresh Plum Torte
  • 1 cup granulated sugar
  • 1 stick butter, softened
  • 1 cup flour
  • 1 tsp. baking powder
  • 1/8 tsp. salt
  • 2 large eggs
  • 1 tsp. vanilla
  • 12 plums (small deep purple, prune or Italian), halved and pitted
  • 1 T sugar
  • 2 tsp. lemon juice
  • 1/2 to 1 tsp. cinnamon
  • Vanilla ice cream or whipped cream for serving
Preheat oven to 350° and spray 9- or 10-inch springform pan. (I used the 9-inch-- it was less dusty.) Cream together sugar and butter until light and creamy. In a small bowl, sift together flour, baking powder and salt. Add to butter mixture with eggs and vanilla and beat well. (I didn't sift together the dry ingredients first, just dumped them in at that step. It worked fine, but maybe you like to sift flour!) Spoon batter into the pan and place plum halves, skin side up, on top of batter. They will sink as it cools. Batter will barely cover the bottom of the pan, which is as it should be! Sprinkle lightly with sugar, lemon juice, and cinnamon. (The first time I made this recipe I forgot to do this, and I did it when it came out of the oven. I almost liked it better that way-- the lemon juice was fresher tasting!) Bake torte for one hour, depending on pan (a black pan takes less time.) Torte is done when tester inserted in the torte comes out clean. (Mine was done in a little over 40 minutes, since I have a black non-stick pan.) Remove from the oven and let cool on a wire rack for a few minutes. Remove from the pan, cool to lukewarm, and serve with vanilla ice cream or whipped cream. (I didn't put anything on it, and it was pretty good plain. The ice cream may have helped the taste of the occasional overly tart plum, though.)

This was how it looked before it went in the oven. I think I used a few more than a dozen plums-- 14 or 15 maybe? Just cover the torte nicely.

Then, while the torte was baking, we got busy with the supper. Tori cut up the fresh green beans.

And I made Crispy Yogurt Chicken, from Pioneer Woman, slightly tweaked.

Crispy Yogurt Chicken
  • Chicken pieces (I had tenders on hand)
  • 2 cups plain, unflavored yogurt
  • 2-3 cloves of garlic
  • Herb of your choice (I was in the mood for Rosemary, snipped from my herb garden!)
  • Juice of one lemon
  • Salt
  • Butter
  • 2 cups Panko bread crumbs (these bread crumbs are awesome, but plain old bread crumbs will work if you're desperate)
Mince the garlic and herbs, and add them, along with the lemon juice, to the yogurt. In another bowl, mix the bread crumbs with a bit of salt, or seasonings. Shake salt onto the chicken pieces, dredge them through the yogurt and then through the bread crumbs. Place them on a cookie sheet or in a 13x9 pan. Put dabs of sliced butter on each piece. Now, Pioneer Woman says to cover with foil and bake for 1 to 1 and 1/4 hours at 350°. I'm forgetful and impatient, so I rarely bother with the tin foil, and the chicken will be cooked much sooner than an hour, especially if you cut your chicken into smaller pieces-- it just won't be as crispy. Depending on how rushed I am for supper, I have done this in as little as twenty minutes, or as long as 45 minutes. I also usually crank the heat up a tad-- 375° or 400°. If you do go with the foil, remove for the last 15 minutes of baking.

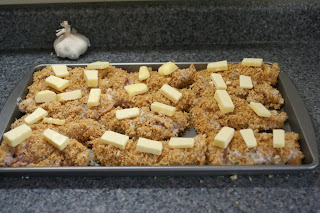
Here's the chicken, a-waiting to be baked.

What a yummy looking supper! That's jasmine rice we're having with the chicken. My in-laws often use this rice, and I'm a huge fan. With just a tad of butter and some salt, it's better than candy!

All year long, we eat frozen green beans quite happily. When these come along, though, we wonder how we were ever content with the frozen ones.

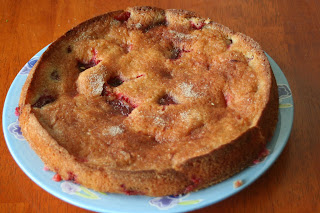
The finished plum torte.

It is quite moist, and SO GOOD! It's one Evan doesn't like, though. He's not a huge fan of plums. This is one of those dishes that does depend heavily on the quality of the plum. There were a few in this batch that were a bit tart, but the rest of the torte was excellent.

Okay, now I have to go to bed so I can get up in the morning and head off to the farmer's market again!

Wednesday, July 22, 2009

Popular Desserts 'Round Here

I got ambitious the other day and made a batch of cookies to take out to Altamont preps. They seemed to be a hit, so here's the recipe! These have been Clover and Cheyenne's favorite cookies for about a year now!

The great thing about these cookies is they don't spread much when you bake them. You can really cram them on the sheet-- as illustrated here.

Here they are while raw...


And here they are after baking (this is how much you will get if you make them fairly largeish-- minus the obligatory dough tasting.)

This recipe was originally published in our newspaper a few years back. I've tweaked a few things, mainly doubling the recipe while still only using one bag of the Peanut Butter Chocolate Swirled Chips. They still have lots of chips, and it's cheaper! The Swirled chips aren't carried at our Super Wal-Mart, I have to go to Wegmans to find them. Worth searching them out, though!

PB&Chocolate Oaties
  • 1 cup (2 sticks) butter, softened
  • 1 cup peanut butter
  • 2 cups brown sugar
  • 2 eggs
  • 2 tsp. vanilla
  • 2 cups flour
  • 1 tsp. baking soda
  • 1 tsp. cinnamon
  • 1 tsp. salt
  • 3 cups uncooked oatmeal (I like using the Old Fashioned variety)
  • 1 pkg. (11 oz.) Peanut Butter Chocolate Chip Swirled Chips
Preheat oven to 350 °. Cream together butters and brown sugar. Add eggs and vanilla and mix well. Add flour, soda, cinnamon, salt and oatmeal, and beat until blended. Mix in chips. Place dollops (generous tablespoon) on cookie sheet, and bake for ten minutes. They don't brown much, so just use the timer and trust it! Let cool on cookie sheet.

I also got REAL ambitious last Wednesday and made a pie for my husband (and my brothers that were passing through) in addition to cleaning my house for meeting that night. This is Evan's favorite dessert. It's only this last year that I have successfully managed to roll out two-crust pies, so finally Evan doesn't have to depend solely on his mom for this pie!

I have two different pie crust recipes I like-- one from my Mom, for French Pie Crust, that uses butter, and Sylvia's Perfect Pie Crust from Pioneer Woman that uses Crisco. I like the taste of the butter crust better (duh!) but the other one is slightly easier to work with. Here's the French Pie Crust recipe.

French Pie Crust
  • 2 cups sifted flour
  • 1/2 cup sugar
  • 10 1/2 T butter, diced and chilled
  • 1 egg
  • Pinch of salt
  • 1 T of water
Mix flour and sugar in a very large bowl. Form a well and add butter, salt, and the egg mixed (but not beaten) with the water. Use a pastry cutter to gradually cut the wet ingredients into the dry ingredients. Roll out 1/2 dough and line a buttered pie pan. If you're doing a one crust pie and need to prebake the crust, prick it all over with a fork and bake at 375° for 10 minutes. Cool and fill. Otherwise, fill and cover with the rolled out top crust. Follow the recipe for the filling for baking directions in that case.

Speaking of fillings, I like Joy of Cooking's recipe for raspberry pie filling. I use frozen raspberries, and this recipe is for all frozen fruit and berries. It's one of the sweeter raspberry pies I've had, which is how I like it. I love fresh raspberries to eat out of hand, but if I want PIE, I want sweetness!

Raspberry Pie Filling
  • 5 cups frozen berries, cherries or peaches, defrosted only until separates easily
  • 3 T quick-cooking tapioca
  • 1 1/4 cups sugar
  • 1/8 tsp. salt
  • 2 T butter, melted
Mix all the ingredients together. Position the oven rack in the lower third of the oven and preheat the oven to 450°. Turn the filling into the unbaked pie shell and cover with a pricked or latticed top. (Yeah, like I'm ambitious enough to have tried pie lattice!). From my experience, this crust burns easily at the edges, so it is essential to fold aluminum foil into fourths, cut the corner off, and open up to (ta-da!) a ring of foil with which to cover the edges. Bake at 450° for 10 minutes, then reduce the heat to 350° and bake about 45 minutes more. The easiest way to tell when the pie filling has cooked sufficiently is when the kitchen fills with smoke because the raspberry filling has bubbled over and burned on the bottom of the oven!

My brothers tore into it, and poor Evan only got one (albiet ginormous) piece.

Tuesday, July 14, 2009

More Chocolate

These recipes are feeling left out, since they weren't included in my last post about chocolate. So, in the spirit of inclusion, here are two more yummy chocolate recipes.

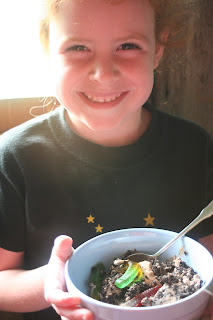
The first recipe is chocolate dirt cake, which gets high marks from kids. I know dirt cake isn't exactly gourmet-- you usually throw some crumbled Oreos, chocolate pudding, and maybe Cool-Whip in and call it good. This recipe has some extras, like cream cheese, that make it yummy enough to serve to adults. You may, however, want to omit the gummy worms in the adult version. They're a little... different.

Marilla liked eating one of the extra Oreos while I made this. She did NOT, however, like me poking the camera in her face instead of getting her out of her high chair the minute she demanded it.

My other recipe is a fudge recipe. It was in our newspaper years ago, and I clipped it out, then didn't make it for three years. Part of the reason was that I had such an easy fudge recipe (Microwave fudge) that it seemed silly to look for another one. Wow, this is definitely worth the extra effort (and extra expense) to make it. It's called "Mamie's Fudge" (it was Mamie Eisenhower's favorite fudge recipe), but I think of it as "Moorish Fudge." One of our friends was here the first time I tried it back in April, and as she cut herself yet another little piece, she said, "This tastes like Moorish fudge." I was desperately trying to rack my brain, wondering if this was really an international delicacy, or whether "Moorish" was some sect like the Amish or something... Then I got that it was "More-ish" fudge because you always want a little more. I'm a little slow on the uptake sometimes. Even now, I picture it as "Moorish" in my head.

Chocolate Dirt Cake
  • 1 (6 oz.) pkg. instant chocolate pudding
  • 3 1/2 cups whole milk
  • 1 (8 oz.) pkg. cream cheese, softened
  • 1 1/2 cups confectioner's sugar
  • 3 /4 cup butter, softened
  • 1 tsp. vanilla
  • 12 oz. Cool-Whip, or 1 1/2 cups heavy cream, whipped
  • 27 oz. (1 1/2 pkgs.) Oreos (Original or DoubleStuff)
  • Gummy worms, optional
This is a great recipe to do in the food processor, ir you have one! (I've had mine for 14 months, and I'm still passionate about it!) Obviously, you can get by without one for this recipe. First, pulse (or crush) the Oreos into fine crumbs and set aside. Then, cut the butter and cream cheese into little chunks, and place in the food processor bowl with the pudding mix, sugar, vanilla, and 1 cup of the whole milk. Pulse until blended. Use a whisk to stir in the remaining 2 1/2 cups milk. Fold in the Cool-Whip or whipped cream. Spread 1/3 of the crumbs in a 13x9 pan, then top with half the pudding mixture. Sprinkle another third of the crumbs over that, pour on the remaining pudding mixture, and finish with the last of the cookie crumbs. If serving to kids, strew gummy worms all over the top!

Mamie's Fudge (Moorish Fudge)
  • 4 1/2 cups sugar
  • Pinch of salt
  • 1 can (13 1/2 oz.) evaporated milk
  • 2 T butter
  • 12 oz. semisweet chocolate, chopped
  • 12 oz. German sweet chocolate, chopped
  • 1 jar (7 or 8 oz.) marshmallow creme
  • 2 cups nuts (if you like nuts in your fudge-- I usually don't!)
Combine sugar, salt, evaporated milk and butter in saucepan; boil 6 minutes. In a large bowl, combine the chocolates, marshmallow creme, and nuts. Pour boiling syrup over the chocolate mixture and stir until the chocolate is melted. Pour into a buttered 13x9 pan. Let stand a few hours before cutting. Makes about 40 (very rich!) pieces.

Monday, July 13, 2009

Summer Salads

I love eating salads, but I'm pretty lazy about making them. I have often told my sister Lindsey, who makes awesome salads with lots of interesting, finely chopped ingredients, that I would gladly scrub her bathroom for her if she came over once a week and made me a massive salad. Sadly, she did not think the commute from Alaska was really worth it.

These are two salads that are not that difficult to throw together, and even if they were, they would be worth the effort. The strawberry romaine salad was a recipe from Evan's side of the family, as many of my yummy recipes are. The Farmer's salad was one Bet made last week, and I've already had to make a huge one for me and Evan to plow through. Alas, Evan isn't crazy over it, so I've had to eat lots of it myself-- bummer!

Strawberry Romaine Salad
  • 3/4 cup mayonnaise
  • 1/2 cup sugar
  • 2 T red wine vinegar
  • 1/4 cup milk
  • 2 T poppyseeds
  • Honey-roasted peanuts
  • Romaine lettuce
  • Strawberries
Combine dressing and pour over chopped peanuts, lettuce and strawberries.

Farmer's Salad (originally from All Recipes)
  • 1 head iceberg lettuce, torn into bite-sized pieces
  • 1 head fresh broccoli florets, cut into small pieces
  • 4 oz. shredded cheddar cheese (Bet's addition, so optional, but oh-so-yummy!)
  • 3/4 cup mayonnaise
  • 3 T white sugar
  • 1 T distilled white vinegar
  • 1 pound bacon
Fry bacon until lightly crisp. Crumble into bits, and measure one cup. Or throw the whole shebang in, as I do. In a large bowl, combine lettuce, broccoli and cheese. Prepare the dressing. Now, if you've got a large crowd to eat this right away, mix all the dressing in. Otherwise, I'd divide the salad and only dress half of it. It's a big salad, and it doesn't keep well with the dressing on it. I waited three days to dress the other half, and it was still very fresh. Oh, and throw the bacon on. It is SO good, I had to dig the leftovers out of the fridge at 10:00 the next morning for a morning snack.

Sunday, July 12, 2009

Differing Ideas on Sunday Night Supper

I eat one thing for breakfast-- raisin bran. Ever since I was about seven or eight, I have clung to my bowl of raisin bran to start the day off right. (There was a brief flirtation with both Frosted Mini Wheats and whole grain toast with banana and peanut butter, but raisin bran won my heart back.) The problem is, I really like lots of other breakfast foods-- pancakes, French toast, eggs, oatmeal. I just don't like to eat them in the morning. I love to cook them for supper, though!

Evan is a latecomer to the idea of breakfast. It is only since he started working construction that he even eats breakfast. And he's fairly lukewarm on eggs, oatmeal, and the rest. He likes suppers with MEAT in them!

The one time our differing ideas can coexist fairly comfortably is Sunday night. Evan would be perfectly happy eating a bowl of popcorn while vegging with his computer, but he will eat something if I make it. Since he doesn't have high expectations for Sunday's supper, breakfast foods are okay.

Until tonight, when I geared up to make pancakes, and Evan rebelled and said he wanted leftover spaghetti! Cheyenne, trying to be cool like Daddy, echoed him. So I heated up a leftover hamburger and Evan warmed up spaghetti. I'm still thinking of these pancakes, though. They're from an old Betty Crocker book Mom has. I have an older one from the sixties, but this one is from the forties or earlier. I love the illustrations in it, but it is inexorably falling apart. The index has been missing since I was a kid, so you have to guess where in the book a recipe might be. While Mom does the bulk of the cooking in our family, these pancakes are something Dad always cooked.

Betty Crocker's Buttermilk Pancakes
  • 1 egg
  • 2 cups buttermilk (the recipe actually says 1 1/4 cup, but I like them lighter).
  • 1 1/4 cups flour
  • 2 T shortening (I usually use butter)
  • 1 tsp. sugar
  • 1 tsp. baking powder
  • 1/2 tsp. baking soda
  • 1/2 tsp. salt
The recipe just says to mix them all together, but I find it's easiest to cut the butter into the flour with a pastry cutter or a fork, then dump the rest of the ingredients in and mix until just blended. It should be fairly lumpy still. Bake on a griddle or frying pan at medium high heat, flipping them over once the bubbles in the batter pop. Dollop butter on them, drench them in NY maple syrup, and enjoy with a side of bacon and a large glass of milk! This recipe makes 16-18 pancakes; if you want to halve the recipe, you can still use a whole egg, it works just fine.

Okay, in the interest of fairness, here is what Evan wanted tonight. It's what he ALWAYS wants to eat. Anytime I ask Evan for input on the menu, this is what Evan says: "Spaghetti."

This recipe is from the Rival Crock-Pot cookbook. It's tripled, since Evan ALWAYS wants spaghetti. It's an awesome freezer food-- it's handy having frozen containers of spaghetti sauce for a quick supper.

Evan's Spaghetti Sauce (Tripled)
  • 1 lb. bulk sausage (such as Jimmy Dean's sage flavor)
  • 2 lbs. ground beef
  • 3 T butter
  • 3 T olive oil
  • 3 cloves garlic, chopped
  • 3 medium onions, finely chopped
  • 3 (28 oz.) cans crushed tomatoes
  • 2 T salt
  • 1 1/2 tsp. sugar
  • 1 T leaf basil
  • 1 T leaf oregano
  • 3 (6 oz.) cans tomato paste
  • 3/4 tsp. crushed red pepper
Brown the sausage and ground beef. Drain the meat, then dump it in a big (6 qt., at least) Crock-Pot with all the other ingredients. Cook on Low for 8-10 hours, or on High 4-6 hours.


If you don't want to make enough sauce to feed the Russian Army, here is the original, un-tripled version.
This will fit in a smaller Crock-Pot. Actually, both recipes would probably work on the stove-top, simmered on low heat and stirred occasionally.

Spaghetti Sauce (Original Proportions)
  • 2 T butter or olive oil
  • 1 clove garlic, minced
  • 1 medium onion, finely chopped
  • 1 can (28 oz.) Italian-style tomatoes, mashed
  • 2 tsps. salt
  • 1/2 tsp. sugar
  • 1 tsp. leaf basil
  • 1 tsp. leaf oregano
  • 1 can (6 oz.) tomato paste
  • 1/4 tsp. crushed red pepper
  • 1 lb. ground beef, browned

Saturday, July 11, 2009

Chocolate, STAT!

I am starting a new blog for the simple reason that I am tired of lugging my recipe box around with me when I go places. (Philistines have suggested I just lose contact with my recipes while I am away-- I ignore them.) I thought if I post a recipe at least every other day, within a year or so I will have all my recipes available on the internet for use whenever I need them.

The more I thought about how I like new recipes, though, I realized I will probably never catch up with putting them all up on here. However, I love food, and talking about food, and occasionally cooking food, so this blog will be fun for me. I will only post recipes I have actually cooked, and if I'm feeling ambitious, there will even be pictures!

Without further ado, here is a very important recipe. Not that I need to write down this recipe-- this is all in the spirit of passing on some advice for fellow chocoholics.

Now, I do believe in the philosophy of "Moderation in all things." I try not to have lots of junk food around at all times, but there are times when I really NEED chocolate. Sure, I could just swipe a handful of chocolate chips out of my baking cupboard, but why do that when there could be so much more with one minute of effort?

This recipe was introduced to me in my high school French class. While I love to parle francais, this may be the thing that I remember most from that class! This is... a chocolate sandwich. There are probably numerous variations on this French snack, but us Vaughans figured out the quickest, yummiest way to have a chocolate sandwich.

Throw a handful of chocolate chips and a meager tablespoon of butter in a microwaveable bowl.

Microwave 30 to 40 seconds. See how the butter is bubbling nicely?

When you first start to stir, it won't look like much.

Keep going, and it all comes together in a creamy spread!

Then, spread it on bread and enjoy! I love whole grain bread for my tuna sandwiches, but this works better on a sweeter bread-- I like potato bread. (Or potato hamburger rolls, if that is all that is in the bread drawer.) From the time the intense craving first hits until you are sinking your teeth into its yumminess, is about 90 seconds, tops. And if you are lazy and use a knife both to stir the chocolate and stir it on bread, it's pretty minimal dishes!

Another quick and easy path to chocolate indulgence is microwave fudge. Mom gave me the recipe when I first got married. It is also something that can be thrown together in a minute. It does take a while to chill in the fridge, but by then you'll have been able to lick the mixing bowl so the cravings will have subsided!

Microwave Fudge
  • 1 (12 oz.) can sweetened condensed milk
  • 1 (12 oz.) pkg. semisweet chocolate chips
  • Grains of salt
  • 1/4 cup butter
  • 2 tsp. vanilla
Dump sweetened condensed milk, chocolate chips, salt and butter in a microwaveable bowl. Microwave on "high" one minute. Stir until chips are melted and combined (you may have to microwave it another 30 seconds). Add the vanilla (the step I always forget), and pour into a buttered dish. Chill until set. In the meantime, grab a spoon, scrape out the mixing bowl, and enjoy!